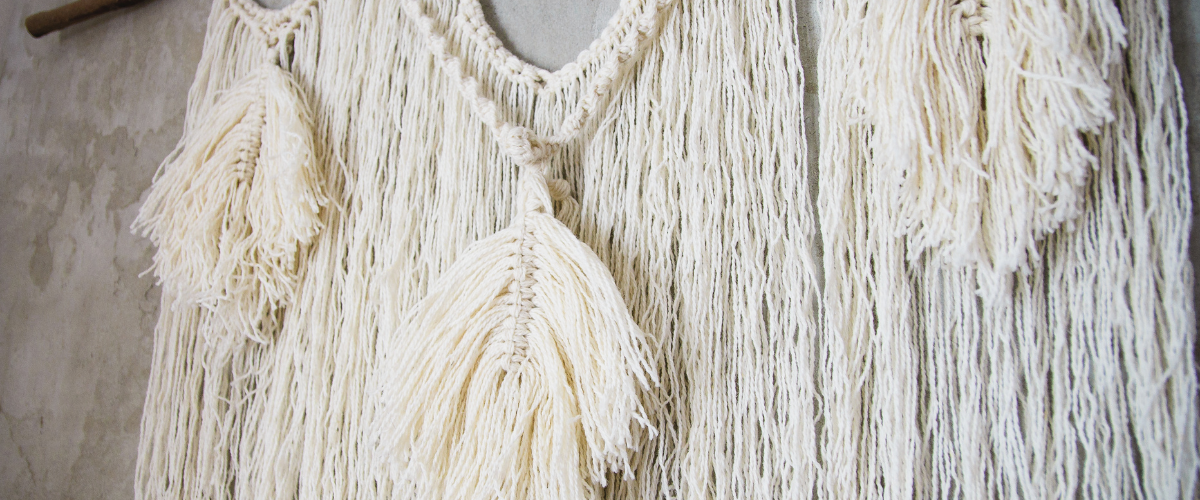
Macrame Leaf Wall Hangings
How to Make Macrame Leaf Wall Hangings?
Sky’s the limit when it comes to designing a macrame leaf wall hanging. Decorate your home with gorgeous macrame leaf wall hangings and amaze all of your friends.
The easiest method to add dimension and texture to any decor is with macrame leaf wall art. They are antique, and they would look great on any wall in the home. Making a macrame leaf wall decoration is a bit easier than you might assume. You only need to know a few fundamental knots to make your masterwork.
You can complete your fall room decor using macrame leaf wall hangings. It provides an earthy touch to your space. The cord’s colors may be changed to match any season. They appear to be very beautiful and will go well with the rest of your decor room.
Users can also choose a leafy macrame feather wall decoration with warm and cool colors. It’s ideal for bringing light to any room while also keeping it warm and pleasant. Mustard, deep blue, teal, or any other colour combination looks fantastic together and adds to the appeal of the macrame wall decoration.
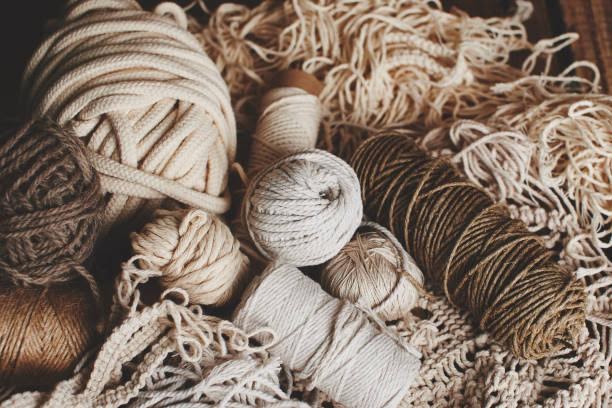
you’ll need a lot of macrame cord when it comes to making macrame feathers wall hanging. You’ll need a genuine macrame cord for this craft, not a clothesline or other cord because the frayed edges are essential to macrame feathers.
Project 1: Make a Macrame Leaf Wall Hanging
You will need sharp scissors. Macrame cord is thick, and dull scissors will give you all kinds of troubles, especially when trimming the feathers at the end. A macrame stiffener and a brush or combs brush out the ends of the feathers to make them look wispy.
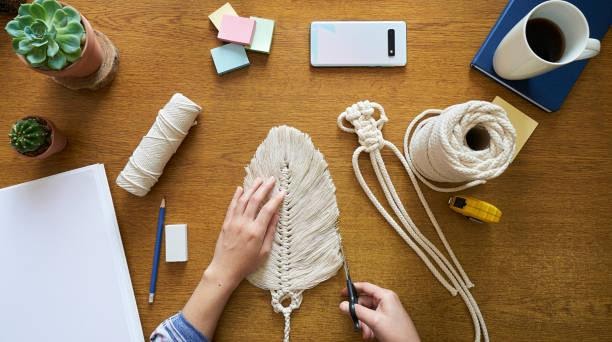
Cut the macrame cord first. For the center, you’ll need one large piece and many shorter parts. Depending on how big you want your finished macrame feather to be, you’ll need to trim those to the appropriate size. Select the length of the feather.
The long piece of the cord should be about twice as long as your macrame feather, plus a few inches. It’s usually better to be a little too extended than too short, so be cautious.
For the short parts of the cord, you’ll need to decide how you want your finished macrame feather to look.
Step 1: Start Your Centerpiece
Start by connecting your long centerpiece to a dowel or a piece of wood if you’re making a macrame leaf wall hanging. One of the simplest and most basic macrame knots is the lark’s head knot.
Place your long piece beneath the dowel after folding it in half. Fold the cord’s folded end over the dowel and secure it in place.
Step 2: Tie on Cords
Fold your long centerpiece in half and lay it on your work table if you haven’t attached it to anything yet in Step 1. Make a half-fold using one of your edge pieces. Tuck it down beneath your centerpiece.
Fold one of your longest edge pieces in half and insert it into the loop produced by the first. Pull it through the first edge piece and place it on top. Insert the first piece’s ends into the second piece’s loop.
It’s time to tie your first knot. Start your second knot in the same manner, but with the sides alternated. Your loop should now be on the left side of the centrepiece, if it was on the right side for the initial knot.
Take your remaining two 12′′ end pieces and fold one end longer than the other once you’ve finished tying on all of your edge pieces. Tie these in the same way you did the rest of your pieces, with the longer end on the bottom. Pull the longer ends of the cables down, creating four long cords. You’ll tie a square knot now. This will prevent edge pieces from sliding down the end.
Starting with the left cord, cross it across the two centre cords. Overlap the left and right cords.
Draw the right cord through the loop of the left chord, returning it behind the two center cords. It is time to tighten it up. Bring the right cord over the middle cables, then go to the right with the leftover cord. Draw the left cord through the loop of the right chord, returning it behind the two center cords. Cut anything unnecessary and tighten it up.
Step 3: Brush out the Edges
Clean up the edges now. If you’re using a slicker brush, make sure you’re using a self-healing cutting mat or something similar to protect your work area from the sharp wires.
Simply begin separating the strands from the centerpiece. The threads will need to be separated in many passes with the brush.
It’s time to trim once you’ve brushed everything out. The varied-sized cords will make your edges all weird if you’re making a tapered feather. Simply cut off all of the rough edges with your scissors, then mold it into any form you like.
Placing macrame feathers directly near the table’s edge is the simplest method to trim them.
Step 4: Stiffen the Feather
Spray the stiffener sparingly and place the feather on a covered surface. Allow the feather to completely dry before turning it over and continuing the process. Allow drying once more.

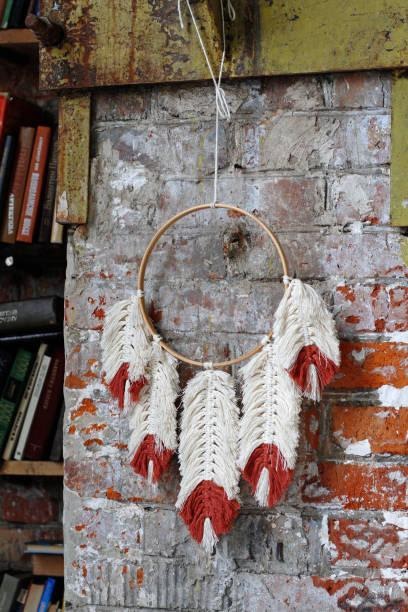
You’ve just created a macrame feather! You can also make small feather earrings, string them on a stick or a dowel to build a wall hanging, or simply hang them separately on your wall.
Project 2: Macrame Feather Wall Hanging with Wool

Knitting wool, while not the same as a string made expressly for macrame, is an excellent replacement. Macrame can be used to make a variety of products, including wall hangings, garments, and coasters. Knitting wool is the perfect material for macrame feathers as it’s smooth and simple to work.
Knitting wool is beautiful, warm, and often costly. It has a strong tradition in New Zealand, Ireland, Australia, and Scotland and originated from sheep. Wool is ideal for knitting because it is simple to convert raw or unprocessed wool into yarn.
Wool is an excellent material to utilize for macrame creations that will be used as home decor. Knitting wool is an excellent material for making macrame feathers and other macrame crafts.
The macrame feathers with wool make a pretty decoration on their own or as part of a mobile cover, garland, or larger piece of wall art. You can use a 5mm twisted wool cord in natural beige color to make cool macrame feathers. You can use the knot tying technique to make a variety of decorative macrame feathers with wool.
You will need scissors, a ruler, a piece of paper and a pencil, a piece of calico/canvas or stiff felt in a matching color, some strong clear-drying glue, and a wire pet grooming brush, or another fine comb.
Step 1: Begin the ‘Stem’
Cut enough wool for the leaf or feather-shaped stem. Make a little hanging loop by folding the wool cord in half and tying a basic knot near the top.
There are two different methods you can use to make macrame feathers with wool.
Step 2: Method 1: Square Knots
Cut the wool cord lengths to fold in half and connect to the stem first.
Guide the loop end of another folded piece of wool cord through the loop of A in the opposite direction. B’s loop must go over the stem’s top.
Take A’s legs and thread them through B’s loop. Now hold the pair of legs on each side and pull in opposing directions. Because the knot on the cord isn’t symmetrical, it’s preferable to use the same procedure to add the following two lengths of cord.
Step 3: Method 2: Cow Hitch Knots
Fold one piece of cord in half and place it perpendicular to the stem, looped end out. Back over the stem, fold the looped end. Pull the cord’s legs up through the loop and tighten them. Pull the legs of the cord to the right to tighten.
Then, because this knot isn’t symmetrical, we’ll use the same procedure but in the other direction to join the next piece of cord. Fold another length of cord in half and put it perpendicular to the stem, with the looped end pointing straight. This rope should be tucked beneath the stem. Fold the looped end over the stem one more.
Step 4: Complete the Knotting
Now you will have to complete the knotting. To do so, first decide on the macrame feather shape’s design, since the length of the ‘fluffy’ cord you want at the bottom will be the length of the stem you’ll need to leave unknotted.
Step 5: Unravel & Brush
Start brushing at the spine and work your way up the cording. To create that lovely, silky fringe, you’ll need a few strong strokes.
Step 6: Adding Support
The purpose of adding support is to give the fibers more structure so they don’t drop as much.
Cut a piece of backing fabric to cover as much of the back of the macrame feather as possible while still leaving a border of uncovered fibers around the edges. This is because we’ll be cutting off the macrame feather shape in this step and don’t want to expose any of the fabric.
Step 7: Cut Out the Shape of macrame feather
This is the point where you can choose if you want more of a banana macrame feather shape or a thin feather shape. You can first cut the fibers back to where the shortest fibers finished. Then cut one half into the curved shape if you want.
Trace this shape onto a piece of paper and cut it out when you’ve trimmed one side to your liking.
Cut the second half of the paper. After all, you want to keep macrame feathers flat for the end outcome to be as balanced as possible.
Brush and trim until you’re satisfied with the results.
How to keep Macrame Feathers flat
Whenever the macrame feather does not really hang straight, there is a method to keep it straight. Learn how to straighten macrame feathers and how to keep macrame feathers flat.

You can try different ways of combing out the feathers on your macrame projects. There is no simple fix; all you have to do is look your best and be thorough with whatever instrument you use. When it comes to brushing out the macrame feathers, patience is key.
Using a Comb to keep Macrame Feathers Flat
An ordinary plastic comb is sufficient. It’s not the most efficient method for straightening macrame feathers, but still, it works. You’ve probably heard folks claim they are using a metal comb, but either one will be fine.
Using a Pet Brush to keep Macrame Feathers Flat
It’s easier to keep macrame feathers flat with a pet brush. You must start from the bottom, but you may brush more cords at once with the pet brush.
A pet brush, on the other hand, will cause more lint to fall off the macrame feather. When picking a pet brush, ensure the bristles are firm and spread evenly apart.
A typical wall hanging can be finger combed to restore the feather’s appearance, but your item may require a little additional assistance to keep it flat.
How to Stiffen Macrame Feathers
The macrame feather should be stiffened because the cording is so delicate that if you take it up and try to hang it, it will just flop.
The macrame feathers can be straightened in a variety of ways. Fabric stiffeners for commercial use are widely available. However, you may create your own macrame feather stiffeners out of common household items.
You can use stiffening spray macrame feathers once they’re finished, depending on your macrame, the ultimate size of your feathers, and how you want them to look. Because some cords are softer than others, when you hang your finished feather, it may fall down.
Here are some common home items that can be used to stiffen macrame feathers or to prepare macrame stiffness spray:
1. White Glue
A combination of white glue and water is one of the easiest macrame feather stiffeners you can create. Begin by combining white glue and water in equal amounts. Depending on how stiff you want the macrame feather to be, you may adjust the glue-to-water ratio.
Spray the macrame feathers with your own stiffener solution using a spray bottle. Keep in mind that glue and water solution spraying is permanent and cannot be removed.
2. Starch
Using starch to stiffen macrame feathers is one of the most pleasant and easy techniques available. Mix one spoonful of starch with half a cup of water to produce the starch solution. Boil the mixture in a skillet over medium heat till it thickens and then becomes transparent. Allow to cool it.
A starch stiffener is great for macrame feathers, although it is not recommended for white macrame feathers since it yellows.
After adding starch and combing, the macrame feathers that have been heated will become flatter and smoother. Trimming will be easier. You can use heat and hairspray to get the same look, and the results will be as wavy as they were before heating. You can use your clothes iron. You’ll probably be tempted to apply it on cotton.
Set your iron to the lowest heat setting and gradually raise it until the cord is smooth. Whether it’s wet or dry, you can do it.
3. Water
Another simple method for stiffening macrame feathers is a sugar-water solution. The sugar and water solution must first be prepared. Sugar and water should be mixed in an equal proportion. Stir the sugar and water mixture to a boil, then turn down the heat and set the pan aside to cool.
The use of a sugar and water solution to stiffen macrame feathers gives them a firm, natural appearance.
4. Wax
It’s also a good idea to use wax to strengthen macrame feathers, although it takes a little more work. It can also give your macrame project a bit more weight.
To make it easier to blend in, choose candle wax that is the same color as the macrame feathers. Also have wax paper, a tray, and flat iron on hand. Before applying a wax stiffener, wash and dry the macrame feathers.
The macrame feather wall hanging will look so much better after everything and the feathers will keep their shape. Macrame feathers are smooth because they are made from cotton. It makes a wonderful project.
Interested in working together?